Posted in : Applications, Azure, Microsoft, Office 365 Av Oliwer Sundgren Översätt med Google ⟶
6 years ago
The Flow and PowerApps connector for Azure AD is great when you want to build an app that read and writes to Azure AD. Or to automate Azure AD tasks like editing groups or users.
However, I quickly noticed that the user that wanted to use this connector in Flow was met by the following error message.
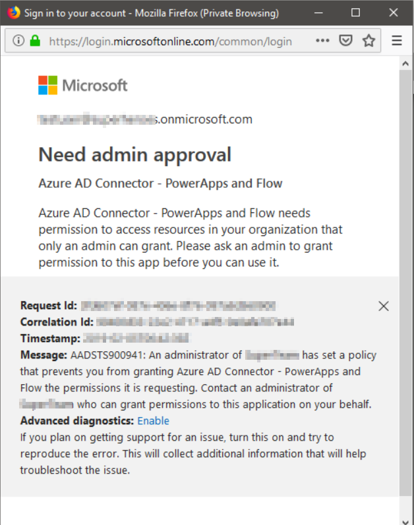
When you normally get this error, you have two options as an administrator.
- Assign users or groups to the application in Azure AD so they get the appropriate permissions and can then consent to the application.
- Log on as a global administrator and consent on behalf of the organization
Consenting on behalf of the entire organization for this connector might not be a good option, since then all users in Azure AD will get the following access to your Azure AD.
- Directory.ReadWrite.All
- Group.ReadWrite.All
- User.ReadWrite.All
And the first option with assigning users to the connector didn’t work in this case.
To work around this issue I used Azure Graph to post a new OAuth permission claim. That granted the single user access to the Connector, below I’ll describe how I managed this
Instructions
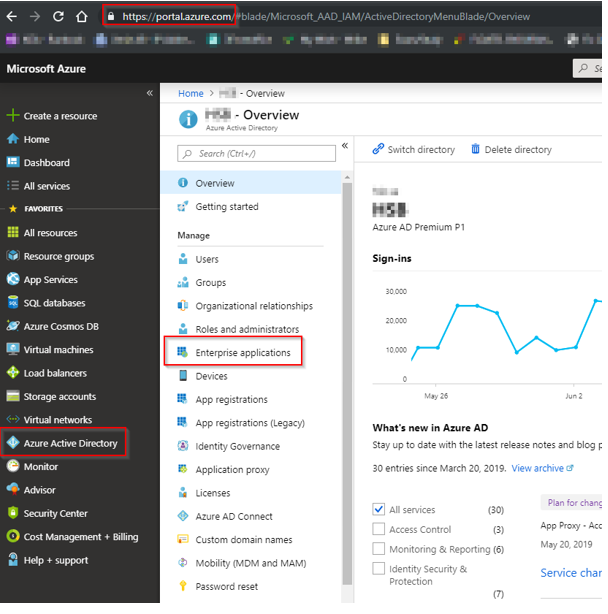
The first step is to verify that the Azure AD Connector is provisioned in your tenant. To do this follow the below instructions.
1: Log into https://portal.azure.com
2: Click on the ”Azure Active Directory” button.
3: Click on ”Enterprise Applications” and then search for the Application ID 2bed6734-1911-40e6-ac44-00d79d70d2bc And then copy the Object-ID. Make sure to note it down.

If you cant find the application by searching for the Application ID, that means the Connector hasn’t been provisioned in your tenant. To do this, log into Flow with a global administrator account, add the Azure AD connector and make a connection to Azure AD. We also need to find the Object-ID of the user we want to grant the permissions for.
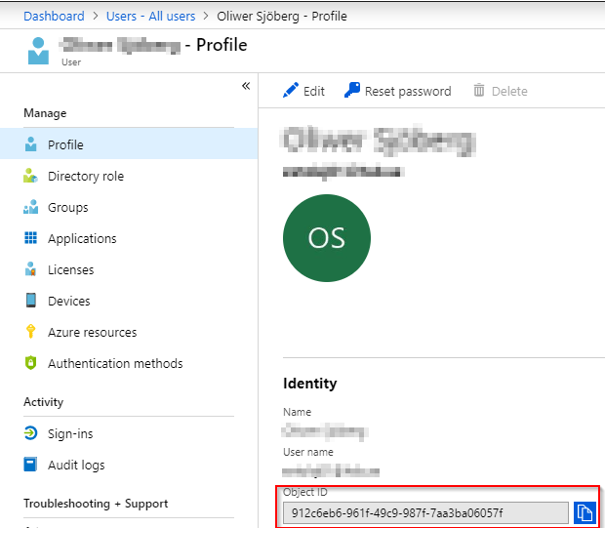
1: Under Azure Active Directory, click on the users tab. And Search for the user.
2: Copy the Object-ID under the Profile tab
After you’ve copied/noted the Object-ID for the Connector and the user you want to grant the permissions for, login to the Azure Graph Explorer (https://graphexplorer.azurewebsites.net) and follow the below instructions.
1: Put the Graph Explorer in the “GET” mode, and paste in the following URL
https://graph.windows.net/myorganization/oauth2PermissionGrants
This will show the OAuth permission grants in your tenant.
2: Do a CTRL+F and search for the Object-ID for the Connector you noted down earlier and copy the entire OAuth grant as shown below. Make sure to note it down.
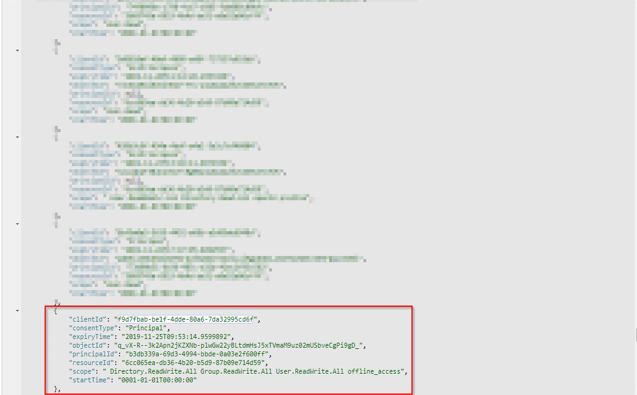
3: When you’ve copied the OAuth Grant, change the mode from “GET” to “POST”
4: Paste the OAuth grant into the empty window
5: Look for the “PrincipalID”. Replace this value with the Object-ID of the user you noted down before. And then click “Go” to post the OAuth permission grant.

Your user should now be able to make a connection to Azure AD using the Connector in Flow and/or PowerApps.
If you have any questions or problems following the above instructions, please leave a comment below or contact me at Oliwer.Sjoberg@xenit.se
Tags : Azure AD, Azure AD Graph, flow, Microsoft, OAuth
Personlig rådgivning
Vi erbjuder personlig rådgivning med författaren för 1400 SEK per timme. Anmäl ditt intresse i här så återkommer vi så snart vi kan.

Add comment