Posted in : Azure, Powershell, Windows Av Stina Perbo Utas Översätt med Google ⟶
6 years ago
This is the second post of the Powershell in the Cloud series, and will focus on executing Powershell code from Azure Function App. If you haven’t read part 1, I highly recommend it as we will be referencing to it
Disclaimer: As of September 2019 the Powershell in Azure Function is still in preview.
As defined in Part 1 we are re-using the use case Leveraging Automation to Reduce your Costs in Microsoft Azure but this time we will approach the scenario using Azure Function App and building a API and integrating the security using Azure AD.
Before we start let’s have a quick recap of said use case
”The scenario we are presenting is that you have adopted Azure to some extent and have Virtual Machines in Microsoft Azure that are somewhat redundant, and to save cost you want to turn them off and deallocate them when they are not in use. The problem is that most of the redundant machines are not used by you or the IT department and you don’t want to give the end-users the option to access Azure in order to manage the machine powerstate.”
To solve this problem we are going to build an Azure Function App with a super simple HTTP API (Powershell core API in the cloud) and allow us to start/stop virtual machines on demand from a web browser.
Azure Function App
”Azure Functions is a solution for easily running small pieces of code, or ”functions,” in the cloud. You can write just the code you need for the problem at hand, without worrying about a whole application or the infrastructure to run it. Functions can make development even more productive, and you can use your development language of choice, such as C#, Java, JavaScript, PowerShell, and Python. Pay only for the time your code runs and trust Azure to scale as needed. Azure Functions lets you develop serverless applications on Microsoft Azure.” – https://docs.microsoft.com/en-us/azure/azure-functions/functions-overview
In line with Part 1 we will try to focus as much as possible on the functionality, and less on the code behind it. However as Azure App Function is a product designed around delivering code in a serverless environment we will have to dig a bit deeper into the code part.
The main features we will look at here is HTTP Triggers and creating Proxies in order to easily create API endpoints. We will also look into the security of the Function App and configure Managed Service Identity (MSI), Role-Base Access Control (RBAC) and we will glance over Azure AD integration.
To make the Function App run Powershell we need to select Powershell as the Runtime Stack during creation. The Function App will run Powershell Core which works crossplatform on both Linux & Windows, however Function Apps currently (september 2019) only supports Windows OS in combination with Powershell. Azure Function App comes in a variety of pricing models. In this example we will choose consumption plan to further reduce costs as it allows for one million free requests per month. To read more about the pricing models visit https://azure.microsoft.com/en-us/pricing/details/functions/

Now that we have a Function App we need to create a Managed System Identity (MSI) and delegate access to the required resources. This is done by navigating to Platform features / Networking / Identity then turn it on and Save. Now we can find the application in Azure AD and assign the access we require using RBAC in the portal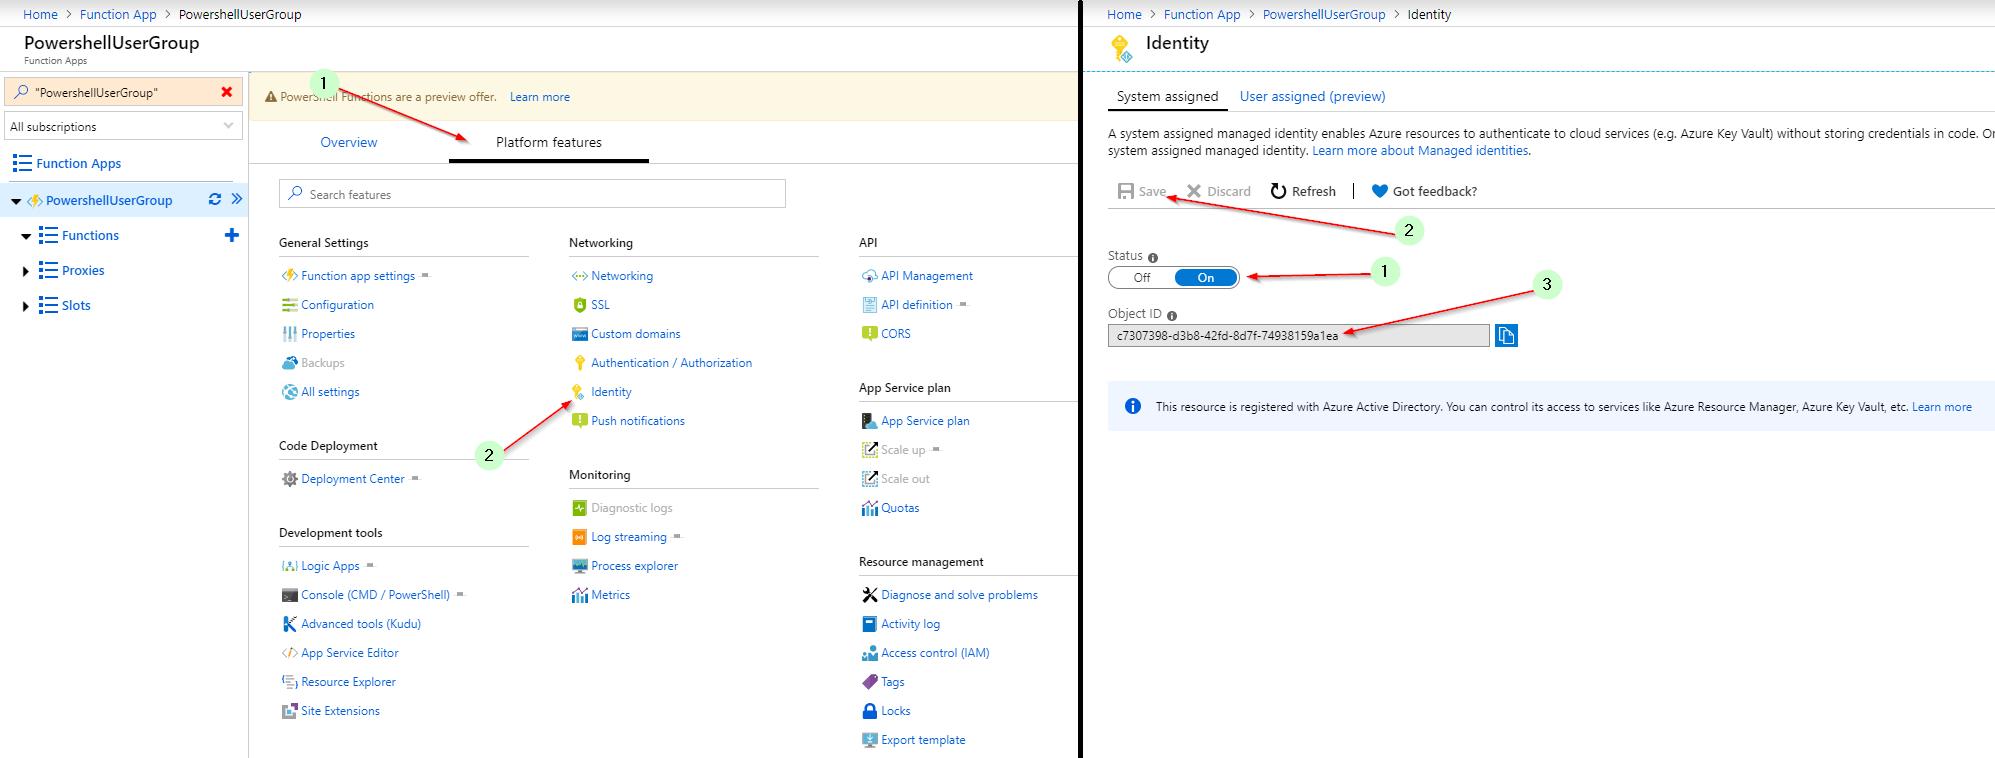
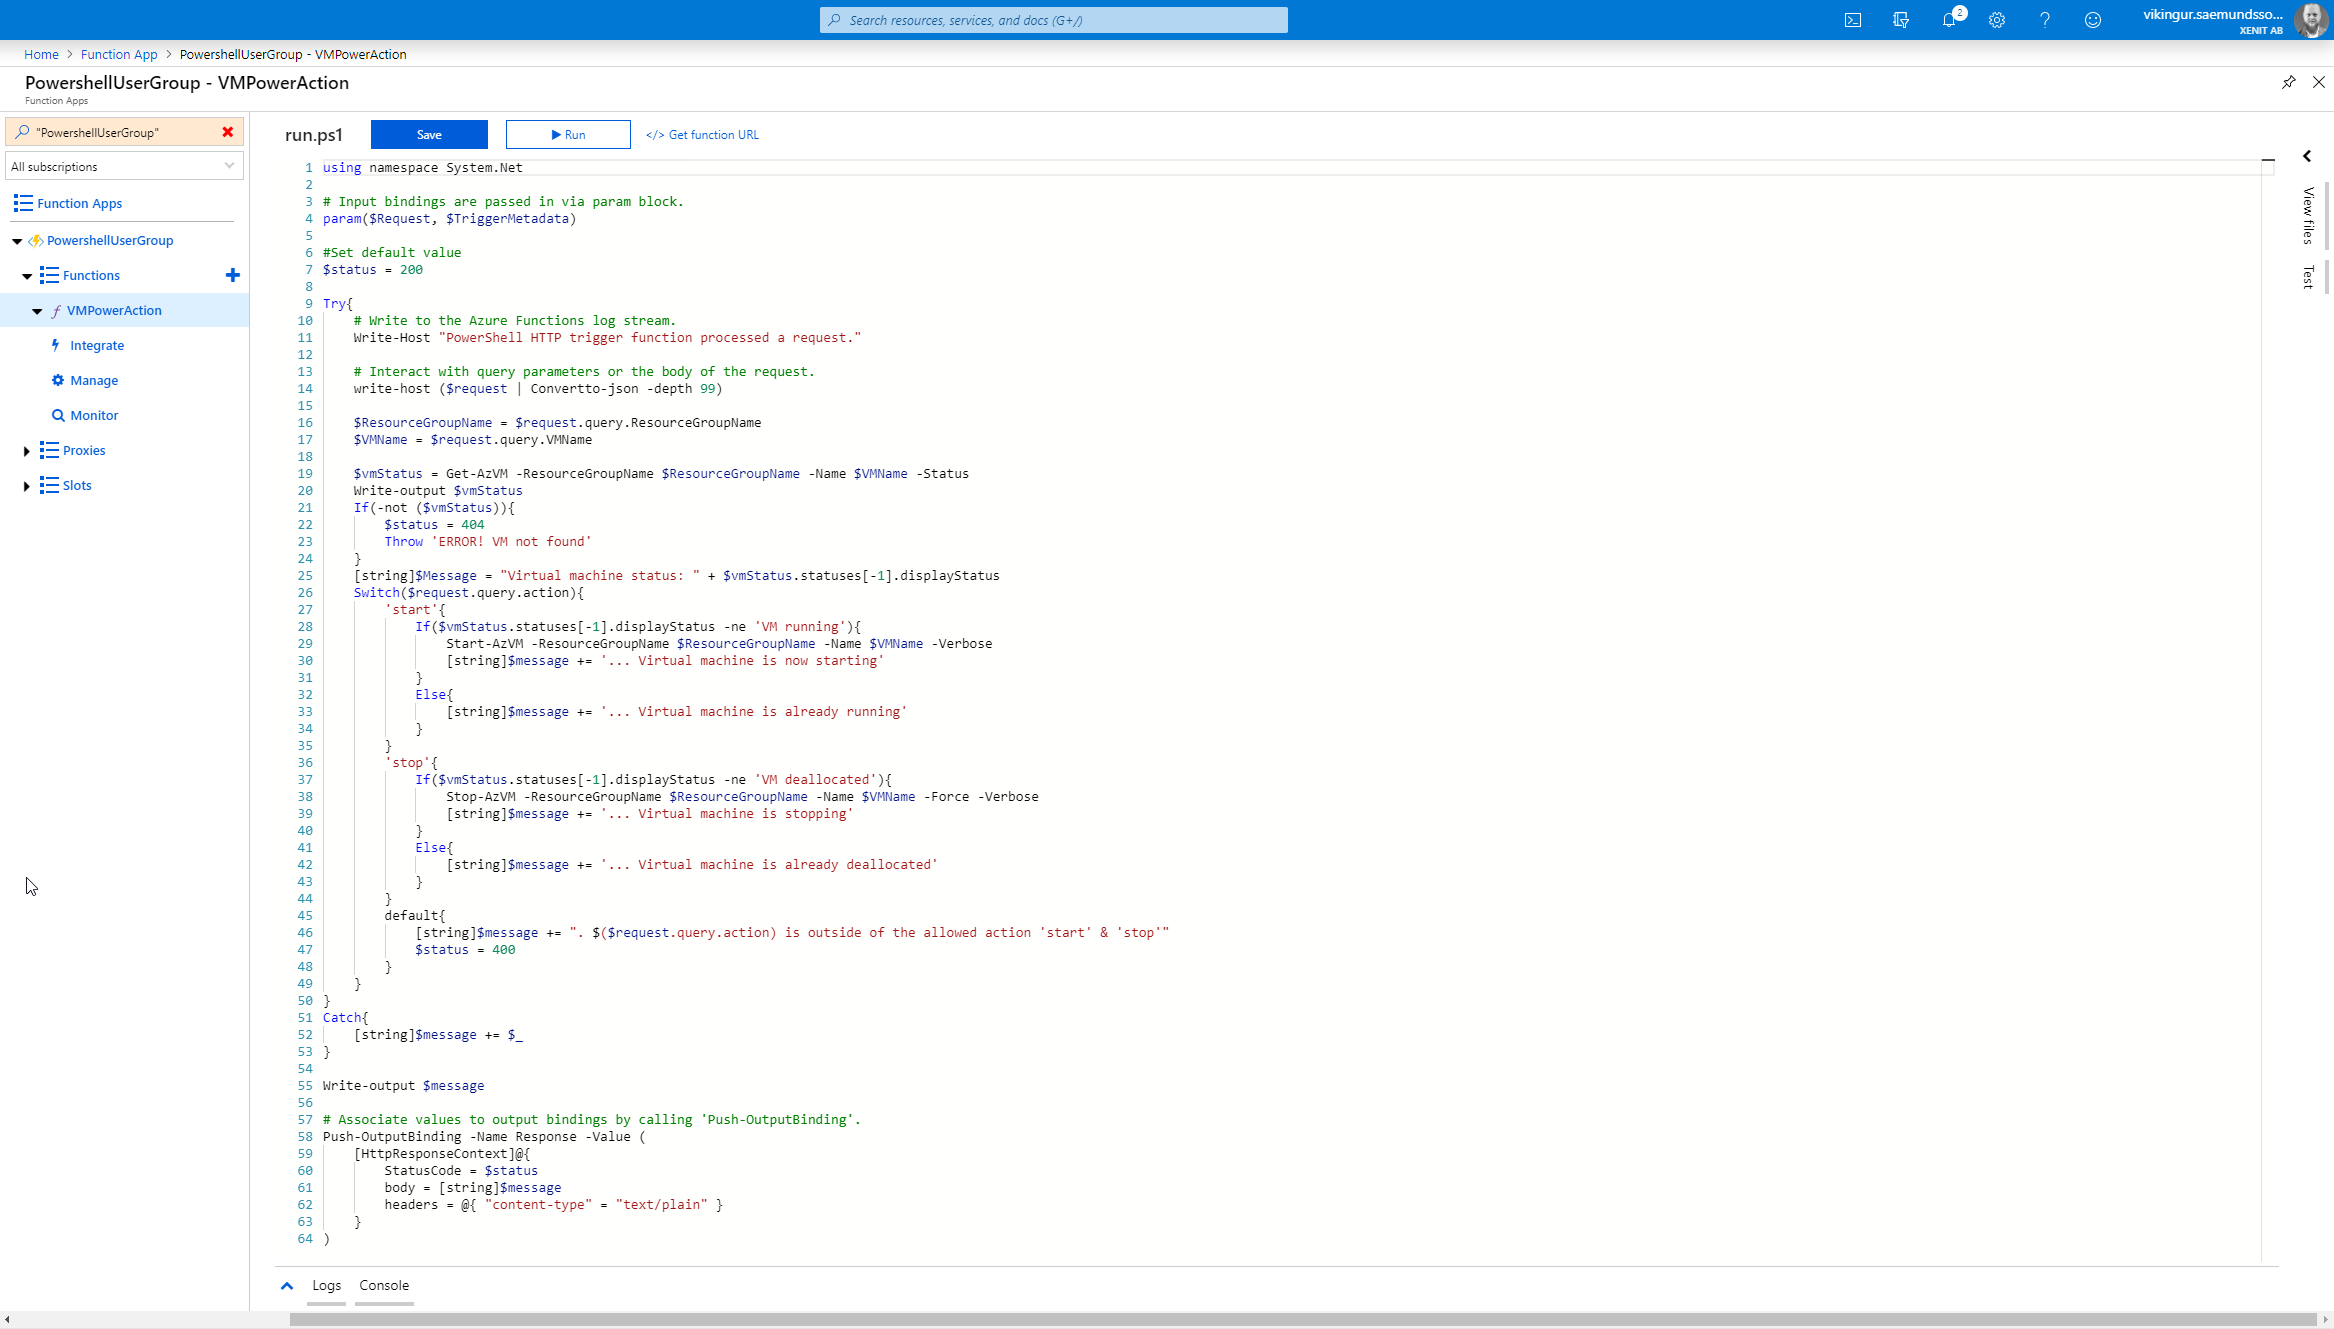
Now that that is taken care of, we need to create our first HTTP API and write our code to manage our Virtual Machines. There are great tutorials on how to properly create functions on the Microsoft Azure Functions Documentation resource. For simplicity we will press the ”+” next to ”Functions” and choose In-Portal -> Webhook + API.
We will name the Function VMPowerAction and set authorization level Function. This will control it by a API key that only authorized users will have access to. By default the Function App will have the Azure AZ module loaded and some example code.
We will replace it with the code below. The function will just like the Azure Automation runbook accept three parameters
- Action – We want this to be a start/stop action.
- ResourceGroupName – Where the VM resides in your Azure subscription
- VMName – the displayname of the VM (in azure)
using namespace System.Net
# Input bindings are passed in via param block.
param($Request, $TriggerMetadata)
#Set default value
$status = 200
Try{
    # Write to the Azure Functions log stream.
    Write-Host "PowerShell HTTP trigger function processed a request."
    # Interact with query parameters or the body of the request.
    write-host ($request | Convertto-json -depth 99)
    $ResourceGroupName = $request.query.ResourceGroupName
    $VMName = $request.query.VMName
    $vmStatus = Get-AzVM -ResourceGroupName $ResourceGroupName -Name $VMName -Status
    Write-output $vmStatus
    If(-not ($vmStatus)){
        $status = 404
        Throw 'ERROR! VM not found'
    }
    [string]$Message = "Virtual machine status: " + $vmStatus.statuses[-1].displayStatus
    Switch($request.query.action){
        'start'{
            If($vmStatus.statuses[-1].displayStatus -ne 'VM running'){
                Start-AzVM -ResourceGroupName $ResourceGroupName -Name $VMName -Verbose
                [string]$message += '... Virtual machine is now starting'
            }
            Else{
                [string]$message += '... Virtual machine is already running'
            }
        }
        'stop'{
            If($vmStatus.statuses[-1].displayStatus -ne 'VM deallocated'){
                Stop-AzVM -ResourceGroupName $ResourceGroupName -Name $VMName -Force -Verbose
                [string]$message += '... Virtual machine is stopping'
            }
            Else{
                [string]$message += '... Virtual machine is already deallocated'
            }
        }
        default{
            [string]$message += ". $($request.query.action) is outside of the allowed action 'start' & 'stop'"
            $status = 400
        }
    }
}
Catch{
    [string]$message += $_
}
Write-output $message
# Associate values to output bindings by calling 'Push-OutputBinding'.
Push-OutputBinding -Name Response -Value (
    [HttpResponseContext]@{
        StatusCode = $status
        body = [string]$message
        headers = @{ "content-type" = "text/plain" }
    }
)
Before we continue, press the </> Get function URL over the code input and copy it. Then we will create a proxy to simplify the input and make it accessible from a web browser. Press the ”+” next to ”Proxies” and input name PowerAction, paste ”/{Action}/{ResourceGroupName}/{VMName}” (this is our parameters) into Route template. Allowed HTTP Methods GET and input the Function URL into Backend URL.
Now expand Request override and select HTTP method POST. This is where we will enter the three parameters from the Route template. Enter Action : {Action}, ResourceGroupName : {ResourceGroupName} and VMName : {VMName} into the three fields.

After pressing Create we get a Proxy URL ”https://powershellusergroup.azurewebsites.net/{Action}/{ResourceGroupName}/{VMName}” – Here we see that we can browse to the function and replace Action/ResourceGroupName/VMName with real actions and resources. For example if we want to stop the VM VM2016 located in the resourcegroup PowershellUserGroupSweden we browse to the address https://powershellusergroup.azurewebsites.net/stop/PowershellUserGroupSweden/VM2016
When browsing it might take a while to run, this is because the Consumption based model creates the instance on demand, so first run might be delayed. Either way when we browse we can start/stop the VM (try it yourself, the VM depending on when you visit the site the function & VM might still exist) we might be met with the following message
Virtual machine status: VM deallocated... Virtual machine is already deallocated
Virtual machine status: VM deallocated... Virtual machine is now starting
AND VOILÀ! We have created a HTTP API to start & stop Virtual Machines in our browser!
Now before you configure this yourself keep in mind that the example above is not secure. In order to secure the application you should really integrate the Azure AD authentication. There are others who have covered this, my favorite post is linked below as well as the official documentation.
Furthermore you can use the examples in this blogpost to create a portal page to list status and present buttons that route the user to the action/resourcegroup/vmname style website. The possibilities are virtually endless!
Again, if you are interested in learning more feel free to contact me at vikingur.saemundsson@xenit.se
Function App Authentication / Authorization
http://www.mattruma.com/secure-an-azure-function-app-with-azure-active-directory/
https://docs.microsoft.com/en-us/azure/app-service/configure-authentication-provider-aad
Tags :
Personlig rådgivning
Vi erbjuder personlig rådgivning med författaren för 1400 SEK per timme. Anmäl ditt intresse i här så återkommer vi så snart vi kan.

Add comment